Sunday, April 25, 2010

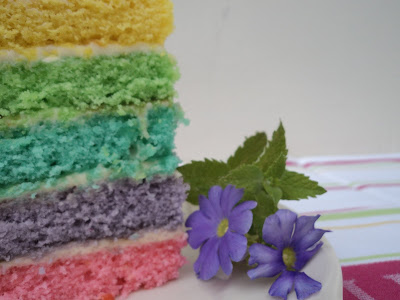
Tarta muliticolor ...... Multicolor Layered Cake


Hace unos días vi en uno de mis blogs favoritos, “Whisk Kid”, una tarta multicolor de lo mas apetecible y llamativa.

Sabiendo lo golosa que es mi madre, la tarta parecía perfecta para el día de la madre. Así que me puse a ello y este es el resultado …. Que mi madre disfruto de lo lindo!!!

Aquí tenéis la receta:


Few days ago I saw in one of my favorite blog , “ Whisk Kid”, a beautiful, striking layered cake.

Knowing that my mum has a very sweet tooth, this layered cake looked like the perfect cake for Mother´s Day. So I got my hands on and this is the result … that my mum enjoyed big time!

Here you have the recipe:


Bizcocho

Ingredientes

3 tazas de harina ( 750 gr.)

4 cucharitas de levadura

½ cucharita de sal

1 taza mantequilla (250 gr.)

2 1/3 tazas de azúcar

5 claras de huevo grandes, temperatura ambiente

2 cucharitas de extracto de vainilla

1 ½ tazas de leche, temperatura ambiente

colorante vegetal

Direcciones

Precalentar el horno a 180º. Untar los moldes de mantequilla, poner en el fondo papel de horno y untarlo con mantequilla.

En un bol grande mezclar la harina, levadura y sal. En otro bol batir la mantequilla y el azúcar hasta que la mezcla este cremosa. Lentamente añadir las claras y batir hasta que estén bien mezcladas. Añadir el extracto de vainilla y seguir batiendo hasta que este totalmente incorporada a la mezcla. Añadir la mezcla de harina y leche de manera alternativa, empezando con la harina y acabando con la leche. Batir hasta que este bien mezclado.

Dividir la masa entre el numero de pisos que se quiera hacer. Añadir el colorante, batir hasta que se consiga el color deseado. Transferir cada masa a su molde. Hornear unos 15 minutos hasta que al pinchar en el centro el cuchillo salga limpio.

Dejar enfriar unos 10 minutos. Dar la vuelta a los bizcochos y dejarlos enfriar completamente. Con un cuchillo recortar bordes e igualar parte superior para dejar una superficie plana. Poner cuatro tiras de papel de horno alrededor del perímetro del plato de presentación. Poner en el plato el primer bizcocho.

Esparcir una taza de frosting con una espátula llegando bien hasta los bordes. Repetir el proceso con el resto de las capas de bizcocho. La ultima capa colocarla con la base cara arriba.

Cubrir la tarta con una fina capa de frosting aprovechando cualquier exceso de visible entre capas. Dejar reposar en el frigorífico durante 30 minutos. Con una espátula recubrir la tarta el resto del frosting.


Frosting de queso fresco en crema

Ingredientes

340 gr queso Philadelphia, temperatura ambiente

250 gr. Mantequilla, temperatura ambiente

4 tazas azúcar glass

¾ cucharita extracto de vainilla

Direcciones

Batir mantequilla y queso Philadelphia hasta bien mezclado. Añadir el azúcar, una taza cada vez, y la vainilla. Batir hasta que la mezcla este bien combinada y “suave”.

El frosting se puede refrigerar hasta 3 días. Antes de usarlo batir y asegurarse que este a temperatura ambiente.

__________________________________________________________

Cake

Ingredients

3 cups all-purpose flour

4 teaspoons baking powder

1/2 teaspoon salt

2 sticks (1 cup) unsalted butter, room temperature

2 1/3 cups sugar

5 large egg whites, room temperature

2 teaspoons pure vanilla extract

1 1/2 cups milk, room temperature

Food coloring


Directions

Preheat oven at 350 degrees. . Brush cake pans with butter. Line bottom of each cake pan with parchment paper; brush again and set aside.

In a large bowl, whisk together flour, baking powder and salt; set aside. In other bowl, cream together butter and sugar. Slowly add egg whites and mix until well combined. Add vanilla and mix until fully incorporated. Add flour mixture and milk in two alternating additions, beginning with the flour and ending with the milk. Mix until well combined.

Divide batter evenly between the bowls. Add enough of each color of food coloring to each bowl, whisking, until desired shade is reached. Transfer each color to an individual cake pan. Transfer to oven and bake until a cake tester inserted into the center of each cake comes out clean, about 15 minutes (working in batches if necessary).

Remove cakes from oven and transfer to a wire rack; let cool for 10 minutes. Invert cakes onto a wire rack; re-invert and let cool completely.

Using a serrated knife, trim tops of cakes to make level. Place four strips of parchment paper around perimeter of a serving plate. Place the purple layer on the cake plate. Spread a scant 1 cup of cream cheese filling over the first layer with a small offset spatula so it extends just beyond edges. Repeat process with the different layers.

Place the remaining layer on top, bottom-side up. Gently sweep away any loose crumbs with a pastry brush. Using an offset spatula, cover the top and sides with a thin layer of frosting (also use any of the excess frosting visible between the layers). Refrigerate until set, about 30 minutes.

Using an offset spatula, cover cake again with remaining frosting.


Cream Cheese Frosting

Ingredients

8 ounces (2 sticks) unsalted butter, room temperature

12 ounces cream cheese, room temperature

1 pound (4 cups) confectioners' sugar, sifted

3/4 teaspoon pure vanilla extract

Directions

Beat butter and cream cheese until fluffy, 2 to 3 minutes. Add sugar, 1 cup at a time, and then vanilla; mix until smooth. Frosting can be refrigerated for up to 3 days; before using, bring to room temperature, and beat until smooth.

Saturday, April 17, 2010

Tarta de Ruibarbo y Fresas - Rhubarb and Strawberry Pie

Cuando pienso en ruibarbo siempre pienso en mi amiga Silvia. Silvia y yo nos conocimos en Ginebra. Durante los años que viví en Ginebra pase muchas tardes de Domingo con Silvia y su familia en su casa.

Las buenas conversaciones con Silvia y Steve, colorear princesas con Alex, jugar a la WII con Marc y perseguir al pequeñín de Mathew era la mejor recarga de energía para la dura semana que tenia delante.

Muchas veces Silvia tenia una maravillosa tarta de ruibarbo. Sabia a gloria sentadas en el jardín tomando una taza de café.

Desde que me fui de Ginebra mis Domingos nunca han sido lo mismo ….. Menos mal que me queda la tarta de ruibarbo.

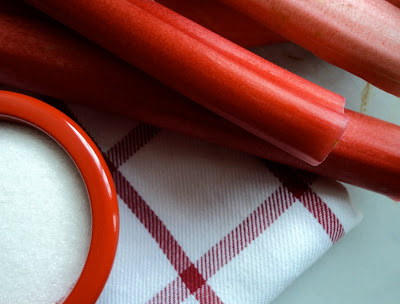
Me encanta la tarta de ruibarbo!!! Me podría comer la tarta entera de una sentada! Me gusta el color, la textura y el sabor.

Ruibarbo es fácil de encontrar menos en España. Si estas en España y quieres hacer la tarta haz lo que hago yo: busca una buena frutería que te traiga por encargo estas “peticiones especiales”

Aquí tenéis la receta: ( ir hasta el final del post)

When I think of rhubarb I always think of my friend Silvia. Silvia and I met in Geneva. During the years that I lived in Geneva I spent many Sunday afternoon with Silvia’s family.

Having a nice conversation with Silvia and Steve, coloring princesses with Alex, playing WII with Marc and chasing little Mathew was the best recharge of energy for the tough week ahead of me.

Many times Silvia had a beautiful rhubarb pie at home that tasted like heaven sited in the garden while having a cup of coffee.

Since I left Geneva Sunday has never been the same …. Luckily I still have rhubarb pie.

I love rhubarb pie !!! I think I could have the whole pie in one go! I love the color, the texture and the flavor.

Rhubarb is very easy to find but in Spain. If you are in Spain and want to bake this pie, do want I do when I am in the country: I found a good grocery store that brings me any “special request”.

Here you have the recipe: (scroll down )

Masa tarta

Ingredientes

Para 10

1 ¼ tazas de harina

½ cucharita de sal

½ cucharitas de azúcar

½ taza de mantequilla fría, cortada en cubitos.

Direcciones

En un robot de cocina mezclar la harina, sal y azúcar.

Añadir la mantequilla. Mezclar los ingredientes hasta que tengan la apariencia de harina gruesa, con trozos de mantequilla del tamaño de guisantes.

Añadir 2 cucharadas de agua helada; mezclar hasta que la masa quede desmenuzada pero que se compacte si aplastas la masa ( si la masa lo necesita añadir hasta 2 cucharadas de agua helada. 1 cucharada al tiempo). No trabajar en exceso la masa.

En una superficie de harina amasar un par de veces, hasta que la masa este compacta. Dejar la masa preparada en forma de disco, envolver en film plástico y refrigerar al menos durante 1 hora.


Crumble Topping

Ingredientes

¾ taza de harina

1/3 taza azúcar moreno

3 cucharadas azúcar

Pizca de sal

6 cucharadas (90 gr.) de mantequilla (cortada en cubitos)

Direcciones

En un recipiente mediano, mezclar harina, azúcar moreno, azúcar y sal. Mezcla la mantequilla con tus manos hasta que se formen grandes trozos de masa. Cubrir y enfriar hasta listo para usar.


Tarta de Ruibarbo

Ingredientes

Para 10

Masa Tarta

Harina para superficie

3 1/4 tazas (800 gr.) de ruibarbo, extremos cortados, troceado en porciones de 2 cm.

1 taza (250 gr.) de fresas cortadas en mitades.

1 taza azúcar

2 cucharadas Maizena

1 huevo pizca de sal

Direcciones

Trabajar la masa para dejarla igualada en una superficie con harina. Ayudarse del rodillo para colocarla la masa en el molde. Con cuidado, presionar la masa en el fondo y laterales del molde. Recortar sobrante de la masa. Refrigerar 1 hora.

Precalentar el horno a 200º .

En un recipiente grande mezclar ruibarbo, fresas , sal y azúcar. En otro recipiente mezclar huevo y Maizena y añadir al ruibarbo y fresas. Mezclar todo.

Colocar ruibarbo y fresas en molde y cubrir con el “ crumble topping”.

Reducir temperatura del horno a 180º. Hornear la tarta hasta que la superficie este tostada y la masa ligeramente tostada, sobre 1 ½ horas ( si la superficie de la tarta se tuesta rápidamente cubrir con papel de horno. Enfriar completamente antes de servir.

__________________________________________

Pie Dough

Ingredients

Serves 10

1 1/4 cups all-purpose flour

1/2 teaspoon salt

1/2 teaspoon sugar

1/2 cup cold unsalted butter, cut into small pieces.

Directions

In a food processor, mix flour, salt, and sugar. Add butter. Mix until dough resembles coarse meal, with a few pea-size pieces remaining. Add 2 tablespoons ice water; mix until dough is crumbly but holds together when squeezed (if needed, add up to 2 more tablespoons ice water, 1 tablespoon at a time). Do not over mix.Turn out onto a floured work surface; knead once or twice, until dough comes together. Flatten dough into a disk; wrap in plastic, and refrigerate at least 1 hour.


Crumble Topping

Ingredients

3/4 cup all-purpose flour

1/3 cup packed light-brown sugar

3 tablespoons granulated sugar

Pinch of salt

6 tablespoons cold unsalted butter (cut into small pieces)

Directions

In a medium bowl, mix flour, light-brown sugar, granulated sugar, and salt. With your hands, work in butter until large, moist clumps form. Chill, covered, until ready to use.


Rhubarb Pie

Ingredients

Serves 10

Pie Dough

All-purpose flour, for dusting

6 cups of rhubarb, ends trimmed, cut crosswise into ¾ inch pieces

1 cup strawberries cut in halves

1 cup sugar

2 tablespoons corn meal

1 egg

Pinch of salt

Directions

Place the pie dough on a floured surface. Roll out dough to a 14-inch round.

Place the dough around rolling pin; carefully unroll over a 9-inch pie plate. Gently fit dough into bottom and sides of plate, being careful not to stretch or tear. Using kitchen shears, trim dough to a 1-inch overhang; fold under, and press gently to seal. Crimp edges if desired. Refrigerate 1 hour.

Preheat oven to 400 degrees. In a large bowl, toss rhubarb, strawberries with sugar and salt. In another bowl mix corn meal and egg. Add to rhubarb and strawberries. Mix all. Pour into pie shell; sprinkle with Crumble Topping.

Place pie in oven; reduce heat to 375 degrees. Bake until topping is browned and crust is lightly browned, about 1 1/2 hours. (If topping or crust begins to brown too quickly, tent with foil.) Cool completely before serving.


Risotto con Apio, Manzana y Curry - Risotto with Celery, Apple and Curry

Hace un par de semanas mi amiga Tatiana y yo estabamos cenando en un restaurante fantastico en Lugano, Suiza. Todo tenía una pinta buenisima. Mirabamos la carta una y otra vez. Pasta, pescado, verduras .... Después de un rato nos miramos y llegamos a la misma conclusión: al final siempre risotto.

Este risotto es sencillo, sabroso y fragante .... La mezcla del apio, la manzana y el curry es muy interesante. Aqui va la receta:

Ingredientes

Para 4

400 ml de caldo de veduras
1 cucharada de mantequilla
1/2 cebolla picada
1 diente de ajo
1 1/4 taza de arroz
2 ramas de apio troceado
1 1/2 manzana
1 cucharadita de curry
2 cucharadas de aceite

Direcciones

En una cazuela hervir el caldo a fuego lento.

En otra cazuela, pochar en aceite la cebolla y el ajo. Una vez cocinada la cebolla y ajo añadir el arroz.

Añadir dos tazas de caldo caliente, con el fuego medio-bajo, mover el arroz hasta que el caldo se haya casi absorbido, unos 10 a 12minutos. Añadir el curry , apio y manzana. Continuar añadiendo caldo, una taza cada vez. Mover el arroz ocasionalmente. Esperar a que el caldo se haya absorbido antes de añadir más.

Cocinar el arroz hasta que este cremoso y tierno, sobre unos 20 min. Finalmente añade la mantequilla y mezcla bien con el arroz.


A couple of weeks ago my friend Tatiana and myself were having dinner at this fantastic restaurant in Lugano, Switzerland. Everything looked great. We looked at the menu over and over. Pasta, fish, vegetables .... After a while we looked at each other and we got to the same conclusion: always risotto.

This risotto is simple, tasty and fragrant ... The mix of the celery, the apple and the curry is interesting.
There you have the recipe:

Ingredients
Serves 4
400 ml vegetable broth
1 tablespoons of butter
1 medium onion, finely chopped
1 garlic clove
1 1/4 cups long-grain white rice
2 stalks of celery, chopped
1 ½ apple
1 teaspoon of curry
2 tablespoons of olive oil

Directions
In a saucepan, bring broth to a bare simmer over medium.
In a large saucepan, cook until golden onion and garlic until golden. Cook, stirring occasionally, until softened. Stir in rice.
Add 2 cups hot broth; simmer over medium-low, stirring frequently, until mostly absorbed, 10 to 12 minutes. Add curry, celery and apple. Continue to add broth, 1 cup at a time, stirring occasionally, until absorbed before adding more. Cook until rice is creamy and just tender, about 20 minutes (you may not need all the broth). Add butter and stir.


Wednesday, April 14, 2010

El Guacamole de Luis - Luis Guacamole

Mi hermana trabajó en Minnesota y allí conoció a Luis. Luis es de Colima, Mexico. Según dice mi hermana Luis es muy buen cocinero. Me los imagino en veladas hispano-mexicana, los dos "cocineando" e intercambiando recetas.

Este guacamole se llama "El Guacamole de Luis". Mi hermana lo hace en casa desde que vino de US. Y siempre es éxito seguro!

Aquí va la receta:

2 aguacates
1 tomate
1/2 cebolla morada
1 manojo de cilantro (al gusto)
2 limas
pizca de chile o pasta de chile
pizca de sal

Mi sister met Luis while she was working in Minnesota. Luis is from Colima, Mexico. My sisters says that Luis is a great cook. I can picture them in spanish-mexican evenings exchanging recipes.

This guacamole is "Luis Guacamole". My sister has done it at home since she came back. And it´s always a success!

This is the recipe:

2 avocados
1 tomato
1/2 purple onion
1 cilantro
2 limes
pinch of chile
pinch of salt


Friday, April 9, 2010

El sabor de Asturias: Borona Preñada

Asturias es un un sitio muy especial donde parece que el tiempo se ha parado.Asturias es bella, verde y rural. Asturias es paz en el sentido mas puro de la palabra.Para mi Asturias ha sido siempre el mejor remedio para re-colocar mis prioridades.

Mi abuela Julia era de Asturias. Julia siempre volvía a su tierra. A disfrutar de la gente, su familia y sus recuerdos. A dia de hoy mi familia y yo seguimos haciendo lo mismo y disfrutando de lo mismo que Julia disfrutaba.


El plato que nos ocupa es la borona preñada. La borona es sencilla, sabrosa y humilde. Compuesta de harina de maiz, chorizo, jamón y tocino, la borona se cocina, o "echa" como se dice en Asturias, en dias señalados. Tradicionalmente esos días eran Viernes Santo o las fiestas patronales.

Antiguamente, la borona sin preñar era un plato de diario. Las razones: la falta de harina de trigo y el alto valor energético de maíz. Antiguamente no tenían mucho mas para comer.La borona solo se preñaba en ocasiones especiales.

Una de esas ocasiones especiales es las fiestas de San Antonio en Villahormes. Mis primos y yo no nos perdemos la borona de Lupe. Lupe echa la borona de la manera tradicional: horno de leña, la borona envuelta en hojas de castaño .... asi esta de buena!!

Las fotos de este post (no muy buenas, ya lo se) es de el día de Viernes Santo. Normalmente se toma una entrada ligera y después la borona. Os aseguro que despues de una comida así lo mejor es una buena siesta!

Aunque lo ideal para la borona es un horno de leña también se puede hacer en uno convencional.Hay que tener buenos ingredientes y algo de paciencia: harina de maíz, agua templada con sal (más bien poca), amasarlo todo muy bien y que no quede la masa dura. Después se cubre un molde con hojas de berza o de castañar-, se pone la mitad de la masa en el fondo y encima chorizos, tocino y se cubre con el resto de la masa.

Todo ello se cubre muy bien con más hojas y se deja reposar unas horas. Después se mete en el horno a media temperatura durante unas dos horas y al horno fuerte otras dos (para unos dos Kilos de harina).


Monday, April 5, 2010

Biscuits

Descubrí los biscuits cuando estudiaba en EE.UU. Casi siempre los tomaba para desayunar con huevos revueltos y salchichas en la cafetería de la universidad... si una no engordó sin razón.
Pero el recuerdo mas especial es para los biscuits que hacia la abuela de mi amiga Amy. Los abuelos de Amy vivian en el sur del estado de Arkansas. Y haciendo gala de la perfecta hospitalidad del Sur nos preparaban tipicas comidas sureñas con los mejores biscuits.

Los biscuits que yo cocino no son tan salados como los que preparaba la abuela de Amy. De esta manera funcionan bien con dulce para el desayuno o con salado para comidas,meriendas o cenas. Siempre son los favoritos de amigos y familia.

I discovered the biscuits in college in the US. I used to have them for breakfast with scrambled eggs and sausages in the cafeteria .... I did not put on all that weight with no reason.
But the most special memory is for my friend Amy grandmother biscuits. Amy´s grandparents lived in Arkansas. They were the perfect example of the Souther hospitality. Amy´s grandmother used to cook the perfect souther meal with the best biscuits.

The biscuits I bake are not as salty as Amy´s grandmother. They work great with something sweet for breakfast or with something salty for lunch, snack or dinner. My biscuits are always number 1 the my baking raking from friends and family.


Here you have the recipe:

Ingredients

Makes 8 to 10 biscuits

  • 1 3/4 cups all-purpose flour, plus more for surface
  • 2 1/2 teaspoons baking powder
  • 1/4 teaspoon coarse salt
  • 1 teaspoon sugar
  • 5 tablespoons cold unsalted butter, cut into small pieces, plus more for serving
  • 3/4 cup plus 2 tablespoons buttermilk, plus more for brushing

Directions

  1. Preheat oven to 375 degrees. Whisk flour, baking powder, salt, and sugar in a large bowl. Cut in butter with a pastry blender (or rub in with your fingers) until pea-size crumbs form. Stir in buttermilk until just combined.
  2. Turn dough out onto a lightly floured surface, and knead twice. Pat dough to a 1-inch thickness. Using a 2 1/4-inch round cutter, cut out biscuits, and transfer to a nonstick baking sheet. Repat dough scraps, and repeat once.
  3. Lightly brush biscuit tops with buttermilk. Bake until tops are golden brown, 20 to 22 minutes. Serve hot with butter and jelly on the side. (Unbaked biscuits can be frozen up to 1 month. Brush with buttermilk, and bake 32 to 35 minutes.)